Tuesday, June 8, 2010

Flip It...Flip it Good

The time for the flip finally arrived! To have some music to flip by, listen to Devo "Whip It" and think "Flip It". Here are the lyrics I put together for it:

Crack that flip
Give your boat a slip
Step on a tack
Break your flippin' back
When your project comes along
You must flip it
Before the dream sits out to long
You must flip it
With someone very strong
You must flip it
Now flip it
Into shape
Top side up
Get straight
Go forward
Move ahead
Try to protect it
Its not too late
To flip it
Flip it good
When the right time comes around
You must flip it
You will never live it down
Unless you flip it
No one gets away
Until they flip it
I say flip it
Flip it good
I say flip it
Flip it good
(Repeat from beginning)


The boat was readied for flipping by drilling 1" holes in the box that bow sat on and inserting a pipe clamp with a turnbuckle inserted around the pipe to provide a pivot point. I then rigged that up to a come-along to lift the bow. The plan was to rotate the boat like on a spit. The rear of the boat was place on a salvaged oak bannister rail and jack stands. A rope was also suspended from the ceiling joists as support during the flip.
The forms were removed from underneath the boat, the cradle put in place and with Ted and Roger doing the heavy lifting, we began the flip.


The oak support was removed and the rope and cradle used to provide a rest at half flip.
The boat now rests on the cradle and a new phase of construction is about to begin!

Friday, May 28, 2010

Mark 25 Remote Shift Linkage

I was reviewing my blog yesterday and noticed that I had a comment posted back in April from a reader wanting more detail on my Mark 25 shift linkage as his was purchased in pieces. Here are a couple of pictures and I hope it helps. I put some carpet foam that happened to be nearby under the linkage so the details would not be obscured by background stuff. There is a anchor bracket that is held by the nut holding on the steering bail and the pivot bracket is as shown. I do not yet have a remote shift/throttle control and cables yet, so I'm in the hunt for that stuff. I took a quick look at my pre-1965 Mercury service manual and it shows pictures and instructions for cable hook-up when I get to that point. I found the parts manual on line at the Western New York chapter of the AOMCI website. http://pub9.bravenet.com/photocenter/album.php?usernum=737212788&album=49514#bn-photocenter-1-1-737212788/49514/1/116515/

Tuesday, May 25, 2010

Outboard Lake Testing


Yesterday was a beautiful day and time to give the outboard some time on the water. My son Bill and daughter Katy joined me for some time on the lake. We loaded up the motor and went over to my friend Ted's house and after a bit of switch-er-roo, put my motor on his aluminum fishing boat. Unfortunately, the transom center motorboards were about 1/8" too thick to mount my outboard. So we put it to the side of center where there was a trolling motor mount.


The one issue with the motor is the recoil starter pawls aren't flipping out and engaging the flywheel reliably. This often results is half the rope pulling out before anything happens. So the first start was a bit difficult. Hopefully removal of the recoil unit and a bit of lubrication will fix it. Luckily, Bill is young and strong so he kept pulling and I tweaked the choke until it fired up and ran.
We had a nice couple of hours on the lake. Bill's GPS said our max speed was 21.7 mph! I'm sure with the motor in the center of the transom, some tilt adjustments, height adjustments, and tossing a child overboard, we could have gone faster!

Monday, May 17, 2010

Painting the Bottom

The day of painting the bottom finally arrived! The night before, I masked off the sides and transom with 12" paper mask and 2" blue tape about an inch below where I wanted the paint line. Then I used 2" wide green FROG tape and masked the line I wanted for the paint line and overlapped the blue tape.


Sunday morning, I stirred up the Top Secret Coatings primer and poured out about 20 ounces into a quart mixing cup and added a couple of oz. of thinner and stirred some more. Then I poured half of it into a roller pan reusing one of the the same plastic liners I had used for epoxy. Using an ultra smooth foam roller, I rolled on the primer.

Then I stuck the roller in a plastic bag and wrapped it up tight.

After 2 hours, I poured the remainder of the thinned primer into another roller pan liner and put on another coat of primer. After another 2 hours, there were some thin spots, so I mixed another 12 oz. of primer and put on a third coat. By this time the whole house smelled pretty bad even though I had all the vent windows open in the basement and windows opened on the first floor as well. The paint is an oil based paint so it has a strong smell of paint thinner. So I spent some time outside putting down mulch.


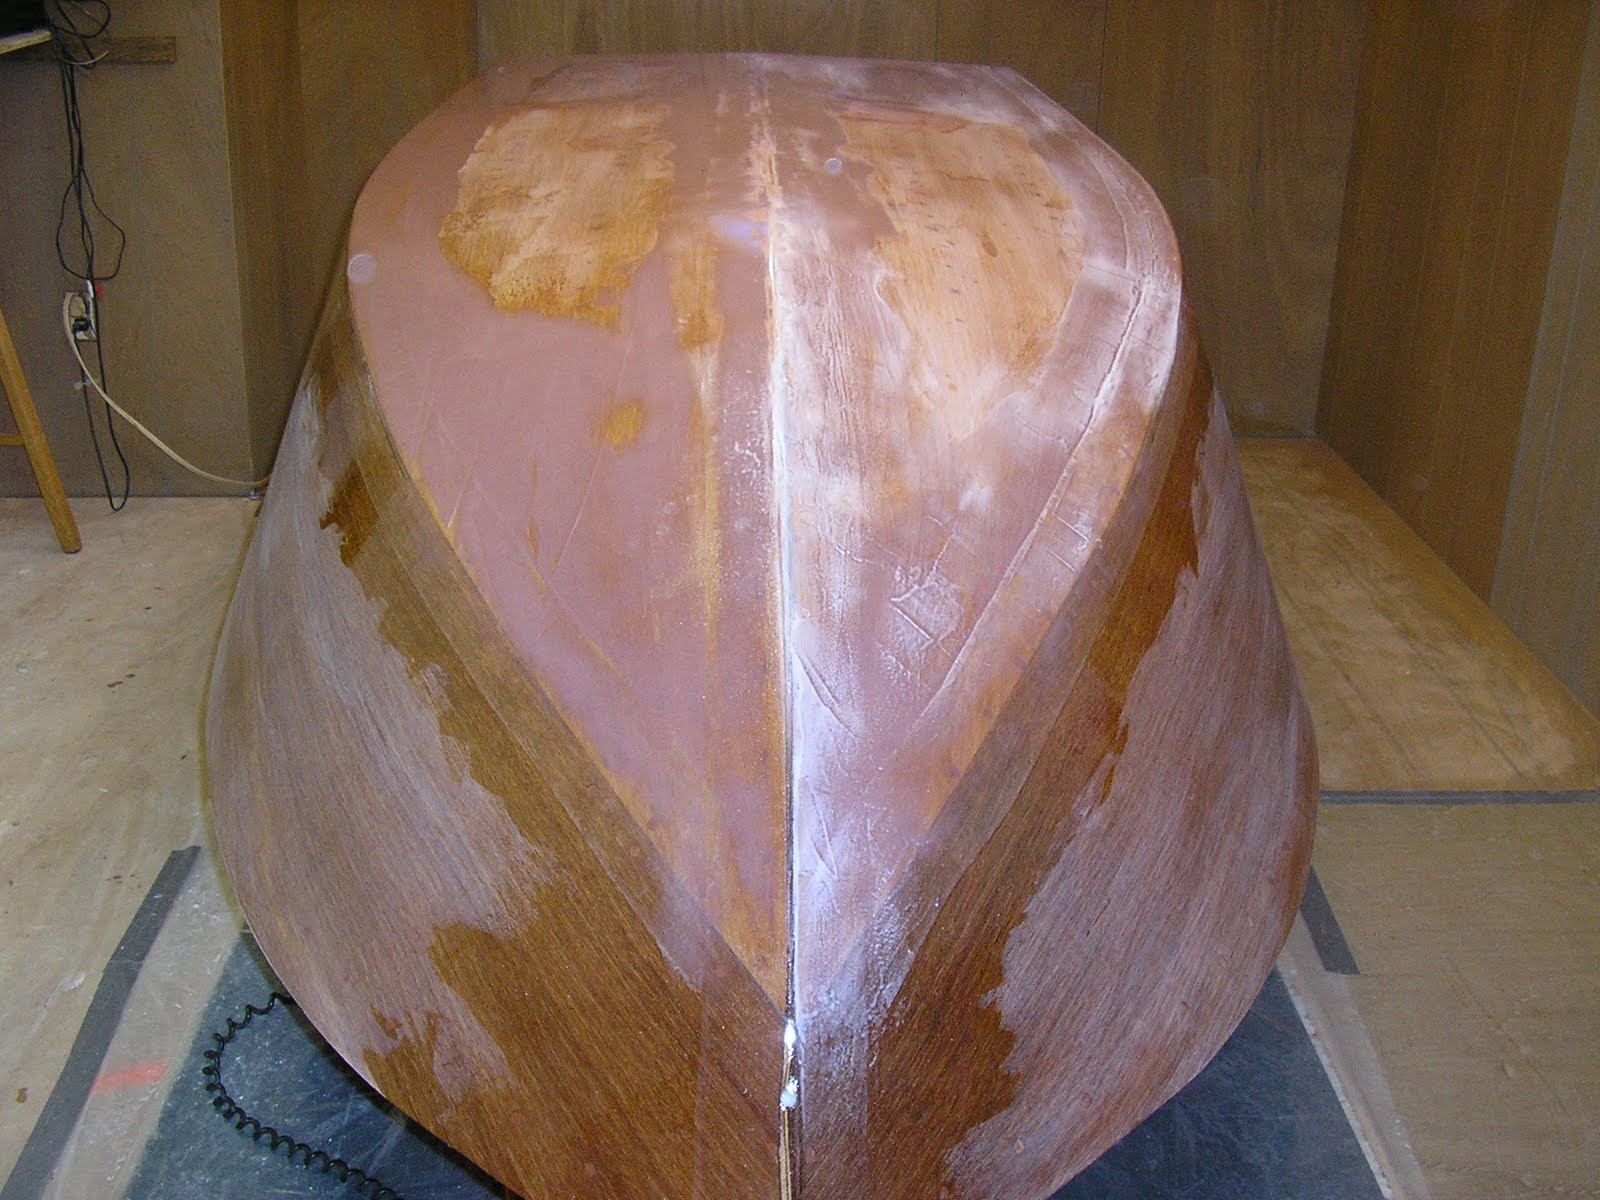
I came back after another 2 hours and hand sanded the primer with 220 grit paper. It sanded very easily and the vacuum had to be used simultaneously to keep the dust from accumulating. The sanding flattened any orange peel or bumps. A thorough vacuuming and wipe down and it was color coat time.

I stirred the Tom Secret Coatings paint, Surf City Blue (#475), and poured out about 12 oz. and thinned with 2 oz. of thinner. Then I rolled away. Note the selection of old blue painting shirt to minimize the appearance of paint on the shirt! All went well with the painting. It seemed to go on best with a fairly slow roll to minimize the creation of bubbles on the surface. After fiddling with a few thin areas it seemed to be time to leave before I messed it up. I came back after about an hour and removed the FROG tape before things were dry to ensure it would remove cleanly. It may not be the best choice of tape as it was beginning to raise in spots after primer so I had to rub it back down. When removed, it left the adhesive on the epoxy surface, but not on the blue tape surface. The next morning, I was able to roll up the adhesive off of the epoxy surface, but its a rather slow process. 
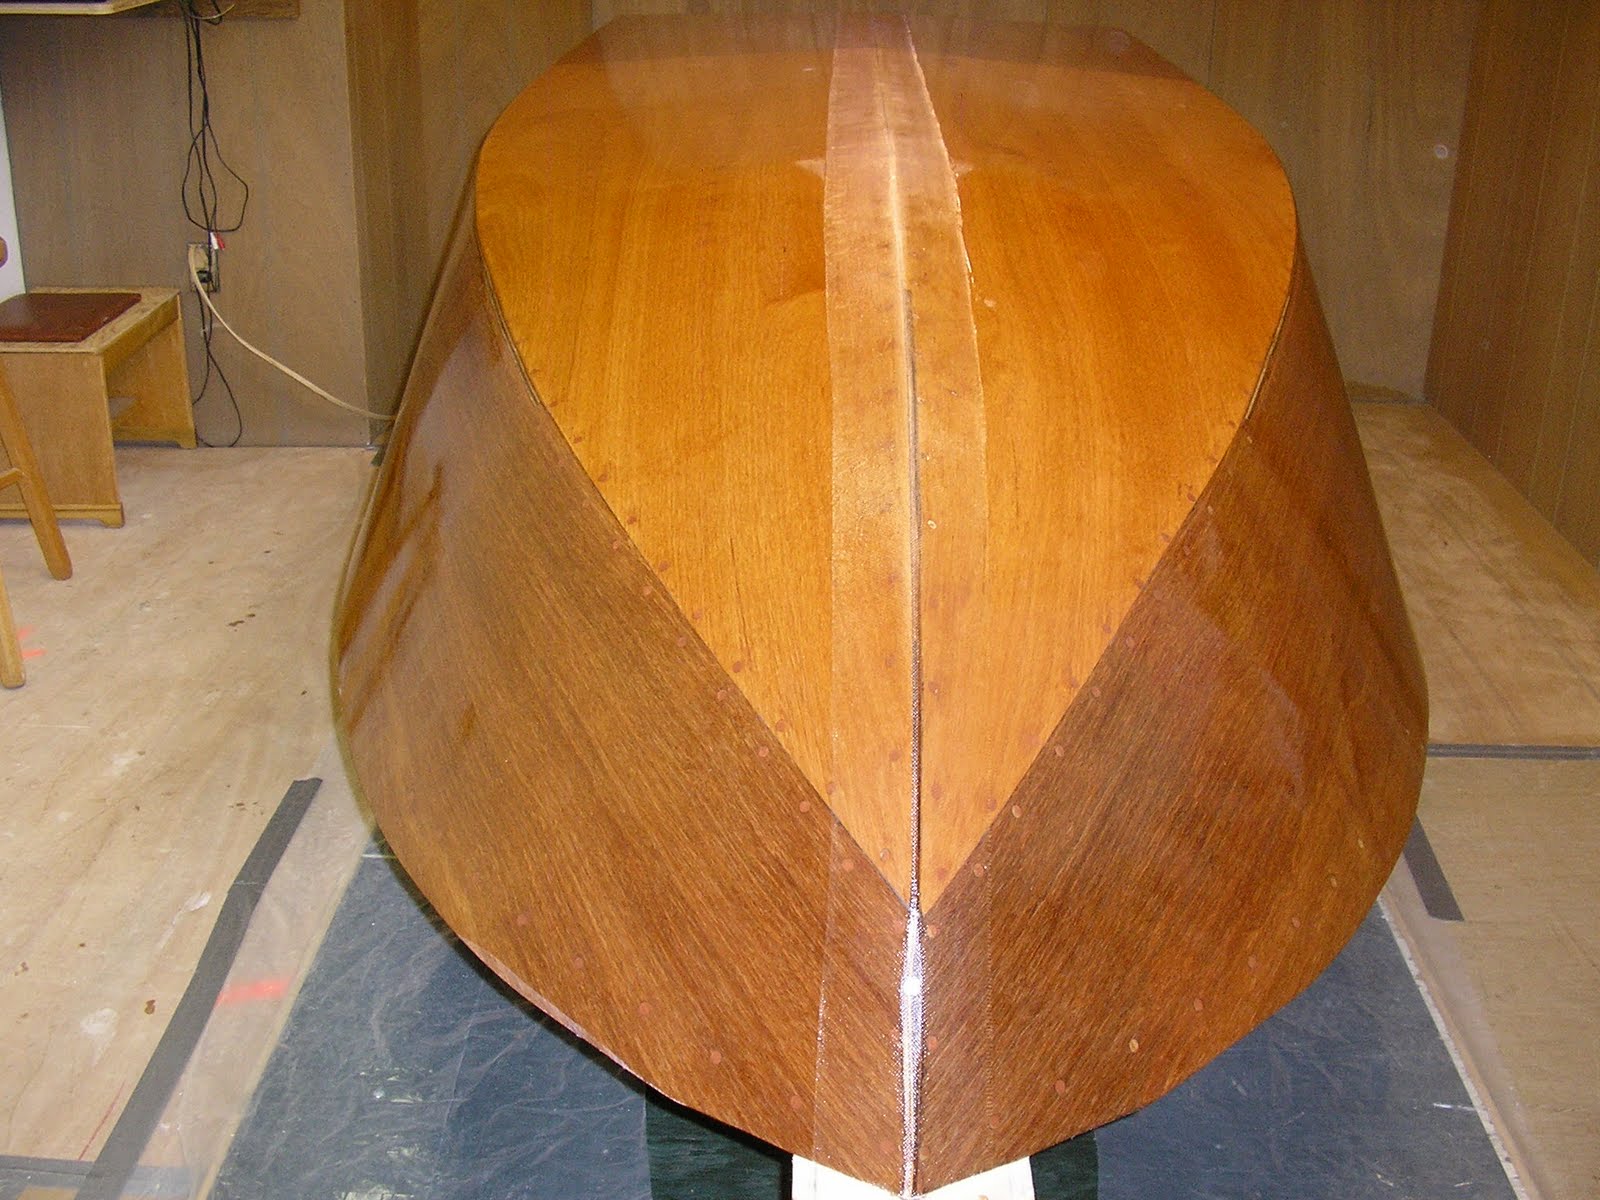
Paint brings out imperfections, so I was pleased to see that the surfaces and lines of the boat still look good. Some of the radii along the chine are inconsistent, but overall, not bad for a first timer, if I say so myself.

After three coats of paint and a week of cure time, I sanded the bottom with an orbital sander using 220 grit. After cleaning, I rolled on another coat of paint and used a section of foam roller (see picture) to "tip it" off like I did on the epoxy and help level out the orange peel texture. This tip-off provided a smoother looking finish than just leaving the rolled on paint. After a day of cure, one more coat, but this time I rolled half the boat, did the tip-off with the roller section and then did the other half so the paint was wetter. The next day I declared it done. It is not glass smooth as there are "brush marks" and some orange peel look in areas where the tip-off was too light, but no sags. But most of it will never be seen anyway. The pictures here are after the first three coats. Later pictures in the Flip It blog are final finish.


Tip off tool.

Wednesday, April 28, 2010

Epoxy, Sand, Clean - Repeat

After the fiberglass cloth is on the boat, the process of building up the level of epoxy begins. It took about 3 coats to get the thickness up out of the cloth in all areas and begin to smooth out. The first couple of applications tend to take on the texture of denim. It then must be sanded smooth before the next coat is applied. Washing the boat between coats was done with a bit of dish detergent and some vinegar in warm water. After that a couple of rinses with wet toweling and a bucket of water to keep it rinsed out.

I decided to put a wood skeg fin down the center of the bottom to provide directional stability. Reading on the Glen-L website there were builders that added them later due to getting stuck in wake troughs and having bad things happen. The alternative is a small metal fin in the center of the boat that is about 8" long and 4-5" deep, but these are prone to damage if a boat is beached or in shallow water. Since a wood skeg fin is also somewhat prone to damage, I read that white oak is a preferred material for it hardness and rot resistance.

I called up my friend Kevin, who is a timber framer and asked if he had a bit of white oak. Since he wanted to see my boat, he offered the board as admission price. We thicknessed planed it and it was more than enough for the job. The skeg is about 5 ft long and tapers from 2" tall at the back to 1/2" at the front. It is held on with 5 - #10 x 2" long screws countersunk and plugged with white oak plugs. I tapered the trailing end to hopefully eliminate any water disturbance that might cause prop cavitation.

The other finesse job needed was squaring up the bottom to transom corner to eliminate potential porpoising. I duct taped a board and clamped it to the transom to provide a dam for the epoxy. A batch of epoxy with microglass fibers was mixed up and squeegeed along the edge. After cure, it was sanded down to match with the bottom and transom surfaces leaving a very crisp corner.
Another coating of epoxy was needed and before the last couple of coats I actually read the bag that the foam rollers came in and they showed cutting rollers in half and then into three crescent shaped sections and using them as a touch off "brush" to smooth and take out surface air bubbles. It worked great and made the epoxy much smoother with fewer valleys, sags, ridges,
or surface bubbles.

After several cycles of sanding, cleaning, and epoxying the boat does not look much different in pictures, but the smoothness and depth of the finish has improved.

I made a cradle for the boat to sit on once it is
flipped over. It can be seen leaning against the wall in the photo. Its all from 2x6 lumber, scribed to somewhat match the contours and will sit level. I drilled holes in the corners to accept some large casters that I bought about 30 years ago at an industrial resale shop. Thought they might come in handy someday. Hope this is that "someday"! On garbage night I found a nice clean carpet remnant that I can "recycle" to cover the cradle to protect the boat bottom that hopefully will get painted soon.

The last photo shows a different view to see the skeg and the finish before I began sanding with 120 grit to flatten and get ready for painting.

After a complete sanding with 120 grit paper, it appeared that I may have sanded down to the fiberglass cloth in three spots. Since I won't have time to begin the painting for at least another week, I cleaned and put another coat of epoxy on the whole boat. Hopefully, the last one. The epoxy needs to fully cure for a week before painting, so it should be ready when I am.


Monday, April 5, 2010

Fiberglassing


Once the boat looked all nice and shiny with perfect wood grain showing through the epoxy finish, it was time to mess it up...big time. So I fiberglass taped and epoxied the joints. I started with the keel joint and used 6" wide tape.
This tape was taped into place with some blue tape to hold it straight and overlapped the transom about an inch. The boat was already prepped for another coat of epoxy, so the fiberglass tape was epoxied and the whole boat got another coat of epoxy. After watching the Glen-L video on how to epoxy a boat, I followed their best practices of taping all joints before using the fiberglass cloth to cover all surfaces. The chine joints were taped and then the transom to bottom and sides were taped. Foam rollers were used to saturate the tape with epoxy. I found a 3" roller worked the best as quite a bit of rolling pressure is needed.

After trying some different epoxy filler to fair in the tape edges and finding sanding difficult, I went and bought some West Systems 407 fairing filler. Since the bottom will be painted, I got over the need to keep the wood pretty and figured I may as well use the right stuff for the application at hand. This filler is supposed to be mohoghany color, but it reminds me of chocolate milk. I slapped it in the areas needed to smooth out the tape transitions and sqeegeed it into a somewhat smooth surface. After curing, sanding with an orbital sander and 80 grit paper worked well and edges could be feathered and surfaces smoothed quite readily. At some point in this process, my wife came down and said "What the Hell?". I quickly explained "It all gets painted later". So it all looked like hell, but was smoother. I kept with just clear epoxy on the sides so I can keep the natural finish, but unthickened epoxy runs and sags like crazy (after you leave the room - just to be sneaky) so its a bit of work to scrape and sand them out.

Then I fiberglassed the transom as suggested in the video to get some practice and confidence. The cloth was cut and taped in place to overlap the bottom by 1-2" and trimmed to fit over the sides a like amount. Corners were smoothed into shape without cutting. Epoxy was rollered in and it all went smoothly. After cure, the edges were sanded down to feather in.

I then laid out the bottom fiberglass cloth on the bottom and trimmed to fit about an inch inside the chine line. My friend Ted said he kept all the cloth overlaps on the bottom of his boat and it simplified the feathering process, so I did mine the same way. I precut the cloth for the sides by splitting lengthwise some 38" wide cloth and rolled it up on shop vac pipes. My daughter's boyfriend, Brett was here for an Easter weekend visit, and since he has fiberglassed a boat before, he was drafted into service. We mixed epoxy, rolled it on the bottom and smoothed out any wrinkles and bumps. Brett mixed more epoxy batches, I rolled, and it progressed quickly. We then pre-coated a side and rolled out and positioned the cloth to overlap the bottom 2-3" and trimmed the ends as needed. We rolled on some more epoxy and worked it into the cloth and then did the final side. My daughter Katy joined in and we had three rollers going. It took about 1 1/2 hours to complete the job. After curing for a few hours, the fiberglass hanging over the edges was trimmed with a utility knife. It felt good to have this major step behind me. Thanks Brett!

Wednesday, March 24, 2010

It'll Float

The bottom plywood has been trimmed, planed, filed and sanded. So the planking is now completed. Screw holes have been filled, sanded, filled, sanded, filled...you get the idea. A coat of clear epoxy has been applied to seal the plywood and get ready for fiberglassing the hull. One of the sheets of plywood used for most of the bottom is significantly lighter in color than the others, but since the bottom will get painted, it will not matter.
Now the beauty of the Okoume wood is evident and it looks like a boat! (capsized). I suppose it would float if pressed into service now, but there is a lot more work to do before I can play.