In order to determine my plan for the deck planking appearance, I made up some sample boards from the scrap cut offs. I did one set in natural colors on one board. On another longer piece of plywood, I made two sample sets, one with the perimeter and king plank dyed a dark brown and another with perimeter and king plank in a vintage cherry redish dye.

I put on a couple coats of epoxy and after a review with my aesthetic advisor, we agreed that the reddish dye was more interesting and seemed to bring out the grain better than the dark brown. The all natural was too much the same. To get a preview of the look of the boat, I set the selected sample on the bow and propped up a mirror behind it to give the appearance of the front of the boat. With the choice made, it was back to getting the decking ready for staining (using a water based dye product).
The first thing to do was plugging the screws for the perimeter planking and king planks. The steel screws used during glue-up were removed, holes bored deeper, silicon bronze screws installed and then wood plugs epoxied in. Plugs were made from cutoffs from the boards used in each place. After setting the plugs were cut flush and sanded.

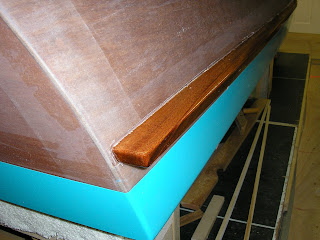
Then I worked on the outer perimeter, getting the plywood subdeck and planking layer flush to the sides with a vertical edge about 3/4" high. This edge will allow enough surface for a 1/4" radius on the top edge and then a 1/2" stainless steel rubstrip. I had to do some epoxy fill-in at the aft end of the boat where I had previously over cut the plywood due to the tumblehome of the rear sides of the boat. The edge lays over slightly as it approaches the transom so the rub strip will twist a bit towards the transom.

The next order of business was sanding. I took my small belt sander to the whole deck and sanded down any high spots along the king plank edges and over the whole boat to fix quite a few places where the grain was running upwards causing some surface tearout. Then it was a progression with the random orbital sander through 80, 100, 120 and 150 grit paper. A rather small paragraph to explain a whole day of tedious work.

I decided to make a thin molding about 3/16" thick and 3/4" wide to go around the inside of the cockpit and motor well areas to cap the planking boards ends and edges. While simple in concept, it is a bit more involved to fit tight and get around the radiused corners. I made a couple of glue-up jigs to create the molding in the corners. I traced the radius on a piece of plywood, cut it out on the bandsaw, and screwed it down to a scrap board. On the table saw from the planking scraps, I cut about 8" long strips about 0.060" thick, ran hot water over a piece and then formed it into the corner on the boat, taped it in place and let it dry. Then laminated a couple of pieces at a time in the jig using water proof Titebond glue. After a while I had 4 corner moldings that almost fit.

The molding is in seven pieces around each opening. The picture shows the epoxy and clamping of the side pieces and a center piece. Then the corners and remaining pieces. Let's hope it all looks good in the end.


 The 1/2" wide stainless steel rubstrip will fit just under the radius on the planking edge and hide the edge of the plywood subdeck and protect the edge from bumps.
 The 1/2" wide stainless steel rubstrip will fit just under the radius on the planking edge and hide the edge of the plywood subdeck and protect the edge from bumps.