Wednesday, September 1, 2010

Head Scratched - Protection Added

After some discussions with my fellow boat builder Ted, it would appear that the side wood strips at the rear of several boats like ours have been added not necessarily as splash rails but as protection against bumps. The shape of the side of our boats at the rear makes bottom edge of the boat prominent and susceptible to getting bumped and marred. A rubstrip along the shearline would be ineffective at the rear. However, since the boat side twists, getting something to fit takes a bit of head scratching.


I decided to build some stationary assists for fitting these bumper strips. I used the 2x6's from the forms and cut vertical pieces at the planned front and rear height and connected with a stringer at floor level. I then split them in half on the table saw so I could make one for each side of the boat. They were attached to the ping-pong table and then belt clamped underneath the boat to bring the verticals tight to the boat.


A 2" wide board was cut to rough length and placed up to the side of the boat. It was placed so it gapped about 3/8" at the front and a like amount at the rear. Then using a scrap piece of wood about 1/4" thick and 1 1/2" square, I sanded a chisel edge so it would ride up against the boat along the board. I drilled a small hole 3/8" in from the edge to allow a pencil point to project through. I laid this piece flat on the board and pushed it up against the boat side and traced a line on top of the board, and then repeated this on the underneath side.


I then took the board to the band saw and cut a line in from the edge every four inches and rotate it as needed to cut to the marked lines top and bottom. Then I set the band saw table to the initial angle needed and cut off four inches at a time and readjusted the table angle as I went along. This cut a spiral shaped surface along a curved line of sorts. Then a trial fit and some filing - some more filing - sanding - filing - and it got close to fitting - sort of.


Then duct tape was put on the side of the boat so epoxy would not adhere. Some scraps were put underneath with more duct tape to catch any epoxy drips. A batch of well thickened epoxy using the brown fairing filler was put on the board and clamped to the boat and allowed to cure. It took some mallet hits to get the board lose after cure but it appears to now have a surface that matches the boat. Filing of top and bottom sides of the board should clean up the excess epoxy.


This last picture shows the epoxied surface, which is now a curved line with a spiral twist - you can kind of see that in the photo.


I'll do the other side and then determine the final shape or line to cut the outside of the board. It will probably end up being a straight taper - narrow at the front and gradually getting wider toward the rear of the boat. I decided to reinforce the sides at each screw attachment point with another piece of 1/4" plywood. To keep it simple and light, a flycutter was used to cut some 1.5" diameter "washers" from 1/4" plywood. These were epoxied in place on the inside of the boat and held in place with a screw and a temporary duct taped block on the outside of the boat. I am not going to permanently attach these rails until the boat is out of the basement. Hate to add any unaccounted for width.

After a bit a trying different lines, a straight line did not work as it made the forward foot or so look like it bulged out due to the shape of the boat side. So I used a strip of plywood to create a curved line and cut it on the band saw and sanded out the bumps and saw lines it until I had a smooth surface.

I plan on putting a 1/2" or 2/4" wide stainless steel rubstrip along the outer edge.

Tuesday, August 31, 2010

I'm Floored.


After a bit of consulting with my aesthetic director, she decided the best looking flooring option was additional battens added between the existing ones. A piece of plywood added over the battens was not attractive and not adding battens made it unclear to anyone that would get in the boat whether to step on a batten or on the hull plywood.

The 6 additional battens were cut and edges routered on the top side. Then with some pencil mark-ups on fitting to the floor, a stationary belt sander made quick work of getting them to fit to the floor. The creative use of clamps as spreaders and some other contraptions allowed the battens to be pushed tight to the floor while the thickened epoxy cured. I could only do 2 or 3 at a time due to limited number of clamps that could be made into spreaders. The floor looks a bit like flattened organ foot pedals without the black keys.

Saturday, August 28, 2010

Throttle/Shift Controller Arrives - Finally!


Back in early July after advertising on the Antique Outboard Motor Club website that I needed a controller, I got a response from a guy in New Jersey that he had a Green Quicksilver manual two lever controller with cables that would be the right length for a Squirt and the appropriate vintage for my motor. He actually had it on a Squirt some years back. We agreed on a price, I sent a check and started waiting for the package to arrive. I made some follow-up calls to him and he said he was trying to track down the package with the post office. After several weeks and a few interim calls, I called ready to ask for a refund and he said the post office never did find it in their system but over the weekend a soggy box with all the addresses blurred arrived back at his shop. It was my wayward controller. He repackaged it and sent it UPS this time and gave me the tracking number. I tracked it on the UPS website right to my door and it only took 3 days.

It's all there and the cables hook up to the engine as it's supposed to. After playing around with various potential locations, it seems that the best location is between the carling and the shear just aft of the dash. If mounted low on the side it has to be on the floor for the levers to clear and it's not a comfortable place while seated in the boat. Inboard of the carling, the cables are exposed and its right where my knee wants to be. This means the decking will need a cutout for the levers to protrude through. Other Squirt builders have mounted it there and now I see why.


The cables have the necessary connectors for hook-up to the motor and are about 9' long. They may be a bit long but it all seems to work. He included an extra set of cables that are about 11' long just in case.

Monday, August 23, 2010

Hang on a Minute - I Gotta' Drain It

There comes a time when the pressure builds and you just gotta' do something that you have put off too long....like putting drain plugs in a boat. The thought of drilling big holes in the transom scared the heck out of me, but I couldn't put it off any longer. After contemplating and procrastinating, I reviewed the cross-section of the transom to determine the lowest point in the transom I could drill a perpendicular hole and not breach the plywood bottom planking. I also looked at photo's on this blog to see where I had located screws to hold on the bottom planking near the keel as I did not want to drill into one.


I then decided to bore a guide hole in a 2x6 and clamp it to the inside of the transom and another scrap board to the outside to prevent break-out when I drilled through. The first hole when well, and then I moved to the other side of the keel and located the hole and drilled another pilot hole in the 2x6 in the right location. The pictures show the second hole about to be drilled.


I tried to insert the drain sleeve into the hole from the outside, but it was too snug. I used a rotary drum sander to open it up slightly until the sleeve would ease in. Then I marked the sleeve with a Sharpie to leave it about 1/8" long. I removed the sleeve and a tubing cutter was used to cut it off. The sleeves were filed slightly around the outside to provide some fine scratches to ensure a good bite. Epoxy was mixed and coated the inside of the holes. Then some high density #404 filler added to thicken it up and smeared into the holes. The sleeves were inserted fully from the outside and I rigged up a bolt with large washers in each one to make sure they were held firmly in the hole while the epoxy cured.

The next day, I used a small ball peen hammer and slowly peened the brass sleeve over to provide a flange on the inside of the boat. The drain plugs fit in nicely and it's all good.


Wednesday, August 18, 2010

Hatching a Plan

At a car and boat show in Franklin, MI there was a "Curley Craft" wood boat with the type of hatch I am building on my boat. Incidently, "Curley Craft" boats were produced at Northwestern Boat Co. on 10 Mile at Evergreen. The place is still there selling boats, outboards etc. and providing marine services, but they no longer build boats.
A three sided frame was built and added into the space to create the hatch surround. The rear beam was doubled up to provide enough surface for the plywood decking.


Then I traced the curvature of the rear beam and made a single hatch assembly that will later be cut into two hatches after the decking plywood is installed.

The hatch is mounted into position using some shims, duct tape on top to prevent drips of epoxy from gluing them in) to equally space it in the hole. The plan is that once the decking is in place, holes will be drilled up from the bottom at the corners to define the margins and then sawcut out the hatch. The side margins will be cut first and the hinges installed (while its perfectly aligned) and then the remainder cut out. Then the hinges can be removed and the hatch cut into two pieces and finished out. Stainless steel banding will cover all the margins.

Tuesday, July 20, 2010

Decking Structure


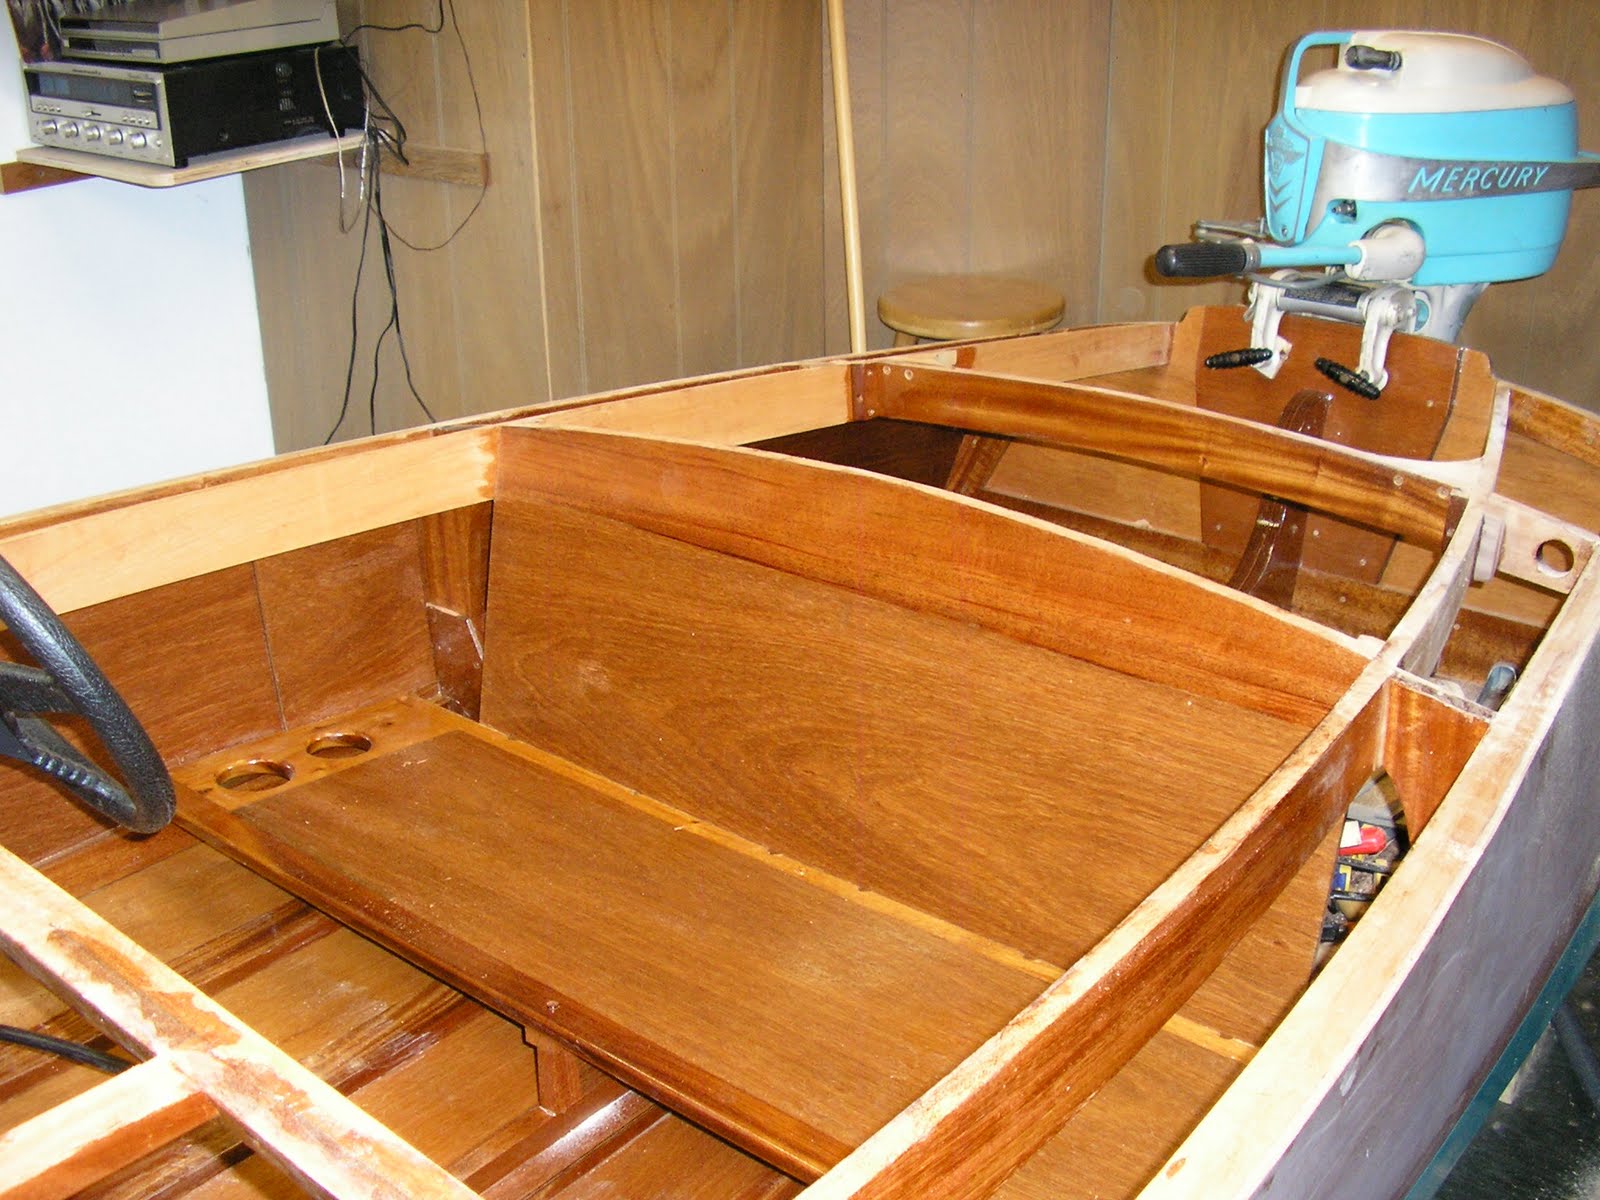
After flipping the boat, it was time to figure out what to do next. The carlings had to go in as they provide the structure for between the main deck beam and the transom. After planing some honduras mohogany down to 5/8" thick, it did not want to bend into position so I got out the soaking pipe and rigged it into the stairwell again and soaked the wood for a day. I rigged up some extensions so the carlings could be pulled into the proper curve above the boat, let dry, and then marked and trimmed to fit. It required some creeping up on compound angle cuts until the angles and length were slowly tuned in.
A mid-front deck beam was added per the plans and then I decided to create an auxiliary dash beam to support the deck strongback (longitudinal middle support) and deck battens so the dash could be made removable while designing and fitting in place. The dash is at a 20 degree angle and I'm using Teleflex steering "The Rack" mounted upside down so the cable routes inward and loops under the deck following Squirt builders Bill & Linda Whitney in Glen-L's WebLetter 65.
I did a lot of playing around with mocked up seat boards after getting the steering wheel in place to determine seat fore-aft location. Then after a lot of circular thinking and planning, eventually built the seat bottom and put in a couple of holes for holding drinks or whatever. With the seat bottom in place I can finalize the seat back angle and mid deck beam.

In order to use a scrap piece of 1/4" plywood for the seat, I rabbeted the seat bottom frames and deck beam to utilize an 8' long strip of plywood only 12 1/2" wide. I used a forstner bit to bore some half round drain holes at the junction of the seat bottom and seat back to allow any water that gets on the seat to drain through. I plan on having upholstered seat cushions at some point, but wanted a functional and structural seat in place without the cushions.

With the motor mounted I figured out where to place the rear most beam while allowing a 6 gallon gas tank to be loaded in between the beam and transom and slid into the corner. It's a bit tricky due to the transom knee, but can be done. I'm planning to build a two door hatch in the deck that opens from the center and hinges to each side. The thought is to allow the center of the boat to open up without the hatch lids being in the way and permit easier access to the outboard since it is a manual start. I also am planning the hatch to allow loading a 6 gallon tank as once all the remote connections to the outboard are mounted, I'm not sure if the back will still be easily accessed. I added the corner radius reinforcements to the opening and added short beam extensions to tie the rear beam and carling to the shear. With these bits in place, the improvement in rigidity of the structure is amazing. I'm working on the corner radius pieces at the dash and then it will be time to tackle the hatches.

Tuesday, June 8, 2010

Flip It...Flip it Good

The time for the flip finally arrived! To have some music to flip by, listen to Devo "Whip It" and think "Flip It". Here are the lyrics I put together for it:

Crack that flip
Give your boat a slip
Step on a tack
Break your flippin' back
When your project comes along
You must flip it
Before the dream sits out to long
You must flip it
With someone very strong
You must flip it
Now flip it
Into shape
Top side up
Get straight
Go forward
Move ahead
Try to protect it
Its not too late
To flip it
Flip it good
When the right time comes around
You must flip it
You will never live it down
Unless you flip it
No one gets away
Until they flip it
I say flip it
Flip it good
I say flip it
Flip it good
(Repeat from beginning)


The boat was readied for flipping by drilling 1" holes in the box that bow sat on and inserting a pipe clamp with a turnbuckle inserted around the pipe to provide a pivot point. I then rigged that up to a come-along to lift the bow. The plan was to rotate the boat like on a spit. The rear of the boat was place on a salvaged oak bannister rail and jack stands. A rope was also suspended from the ceiling joists as support during the flip.
The forms were removed from underneath the boat, the cradle put in place and with Ted and Roger doing the heavy lifting, we began the flip.


The oak support was removed and the rope and cradle used to provide a rest at half flip.
The boat now rests on the cradle and a new phase of construction is about to begin!